Basic commands
ls [-al]: directory listing.
cp [-go]: Copy files.
mv [-i]: move or rename files.
rm [-]: deleting files.
mkdir / rmdir: create / delete directories.
ln -s path link: creates symbolic links (symlinks) for files or directories.
Other commands
file: determines the type of file (/etc/magic).
cat: displays the file contents on the screen.
head / tail: Displays lines at the beginning / end of the file.
less / more: list the file contents.
man filename: online manual of the program.
ctrl+alt+del / reboot: Restarts the system.
shutdown -h now / halt: turn off the computer.
Combinations
CTRL + C: out (kill) program.
CTRL + ALT + Backspace: out (kill) server X.
CTRL + L: clears the screen.
CTRL + A / E: moves the cursor to the beginning / end of the line.
CTRL + U / K: delete the cursor position to the beginning / end of the line.
CTRL + H: deletes the previous word at cursor.
CTRL + R: Search command entered in the history of the bash.
CTRL + D: logout (for this change or unset the var $ IGNOREEOF).
More on terminal
stty -a: list terminal settings.
reset: resets the terminal (back to normal).
(SHIFT) PGUP/PGDN: bash scroll bar.
TAB: auto-complete the commands typed at the terminal.
MOUSE2 / 3: paste the selected text (gpm).
CTRL + S (Scroll Lock): disables VT.
CTRL + Q (Scroll Lock): enables the vt (try this if your terminal lock).
ALT + Fx: changes console.
CTRL + ALT + Fx: changes Island in graphical mode.
Users
w: general information about logged in users and processes.
who: current user information (utmp)
last: history listing logins (/var/log/wtmp)
lastlog: returns information about last logins.
Processes
CTRL + Z: suspend the proceedings temporarily.
top: the processes that consume more system resources.
jobs: running the tasks list in fore / background.
bg/fg: sends process to the back / foreground.
nice/renice: change priorities.
ps -auxw: lists all system processes:
PID (process ID), TTY (terminal or? If a daemon), STAT (process status), TIME (CPU time consumed), COMMAND (the run command).
pstree -p: idem.
time: calculates the time elapsed from start to end of a process.
# Updatedb team
real 1m42.233s
user 0m0.490s
sys 0m10.290s
Killing processes
kill: the most common options are (where id is the same as PID):
kill -HUP process-id: Restart process.
kill -9 process-id: kill process.
killall process: kill process by name.
killall -HUP process: Restart process by name.
System
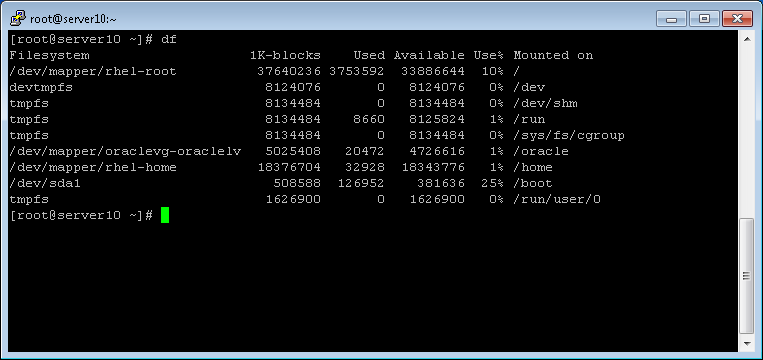
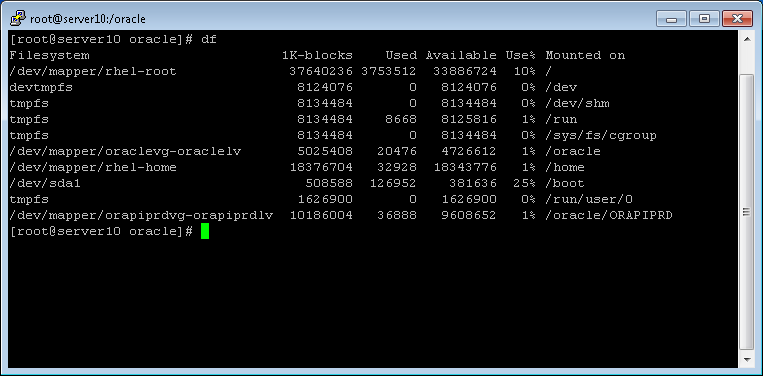
df -h: (free and occupied space on the disks)
du -sh (x): (space occupied by the directory and its subdirectories)
System Information
free: memory status and swap.
vmstat: status of virtual memory (processes, cpu).
lsdev, lspci: Hardware listing/pci devices.
pnpdump: Returns configuration of ISA PnP cards.
lsmod / rmmod: list/remove modules in memory.
procinfo: cat /proc
X environment information
xdpyinfo: server resources X.
showrgbq: returns the database of RGB colors.
xlsfonts: lists the sources recognized by X.
xset m 5/2 1: Adjust the speed and accel. mouse.
Network
Listing process listening on port 80 and their PIDs
lsof -i -n: 80 (-i4: ipv4 and -n: without resolving hostnames)
fuser -v 80 / tcp (list processes that listen on TCP port 80 on ps-like mode)
Pipes and Redirects …
Through pipes’, the output of a command (stdout [descriptor file 1]) is passed as input (stdin) on the other. In general, the output is the input terminal and the keyboard.
Examples:
dmesg | less; ls -l | more
echo “Broadcast Message” | wall
Through ‘<‘ and ‘>’ you can set what will be the stdin and stdout.
Examples:
dmesg> dmesg.txt; more <dmesg.txt
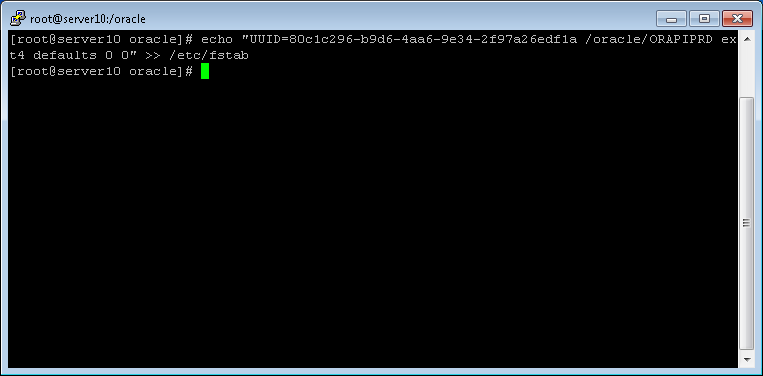
ls -l / tmp >> list.txt (concatenate)
The > signal is equivalent to the tee command.
And to change the stderr (error messages [file descriptor 2]):
ls / admin> list.txt 2> erros.txt (if the directory does not exist, will be the erros.txt stderr and stdout the list.txt)
ls / admin> list.txt 2> & 1 listagem_e_erros.txt (if any, errors will be passed on to the same location as the stdout)
Logical operators
&& ‘And’ (returns true if all expressions are true)
|| ‘Or’ (returns true if one of the expressions are true)
The sign ‘;’ perform both independent return expressions.
For example:
make; make install (the commands are executed in sequence)
make && make install (the second command will only be executed if the first does not return error)
Permissions
File permissions are set through the command chmod, chown and chgrp.
Structure of the command:
chmod
By listing the information of a file or directory, the format is as follows: drwxrwxrwx.
Respectively: directory (d), owner’s permission (read/write/execute), the group (read/write/execute) and other (read/write/execute).
For example, to make a file executable:
- chmod + x filename (executable for all)
- chmod g + x filename (executable for the group)
To change the user and group of a file or directory:
- chown root.root /sbin/firewall.sh (-R: recursively)
Other examples:
- chmod 755 (executable): -rwxr-xr-x
- chmod 4700 (suid) set user id for programs that need to run with root permission: -rws–
To calculate the numerical value of the permissions, just consider the value of the executable to 1, writing and reading as 2 to 4, which would be the decimal equivalent of bits:
rwx = 111 (connected to all bits) = 2 + 2 ** 2 ** 1 ** 2 + 0 = 7
In this way a permission to read and write (4 + 2) to the owner, and read-only for others would have the value 644. To calculate the umask, it would be allowed to mask applied in creating a new file, just then subtract 666 (or 777 for directories) resulting in UMASK 022.
Finding your way around system
Find File Name:
find [path …] -name [filename]
find. -name slackware.png
find / -name “* .png” -print (png files dir. Current)
find / home -print -size + 5000k (files larger than 5MB)
Place a binary:
whereis (or Which) [filename]
Which gcc
gcc: /usr/bin/gcc
Create a database with the location of files (for immediate search)
updatedb
To search: (s)locate [filename]
Find text file:
grep [param] [text] [file]
grep ni man /var/log/packages/grep.tgz (-i: case insensitive, n: line number)
(use ” (single quotes) in [text] to search for exact words.)
ls -l | grep ‘^ – .. x’ (executables list)
ls -l | grep ‘^ d’ (directories list – ‘^’ indicates the first letter of the line)
others:
cd -: switch between directories
pwd: list current path
Checking integrity of a file
Sum: Returns checksum (16-bit) and number of each file blocks.
$ Sum file.tar.gz
cksum: returns CRC checksum and byte each file.
$ Cksum * .tar.gz> cksums
md5sum: returns the MD5 checksum (128-bit) file, and verifies the consistency.
$ Md5sum -check MD5SUMS
Text operations
comm/diff: Compares two files.
ispell: Spelling verficador (d br: Dictionary in Portuguese).
sort: orders in ascending, alphabetical order, etc.
uniq: remove duplicate rows.
cut: returns delimited area (-c5: fifth character).
wc: account lines, words and bytes.
fold: adjust the text to the specified width.
nl numbers the lines of a file.
fmt: reformats the lines of a file.
expand/unexpand: convert tabs to spaces and spaces to tabs.
tr: remove and replace character (-d a-d to remove the letters between ad, a-d, tr a-d A-D to make them sensitive).
Change system date
$ date 0109143001 (09/01/2001 14:30)
$ date -s “mm/dd/aaaa hh:mm:ss”
Creating aliases
Add alias file (example: aliases.sh) in /etc/profile.d/
chmod 755 aliases.sh
# sample script alias.sh
# System wide functions and aliases
cdrom.on alias = “mount/dev/hdd /mnt/cdrom”
cdrom.off alias = “umount /dev/hdd”
zipdisk alias = “mount -t vfat /dev/hdb4 /mnt/zip”
alias rm = “rm -i”
alias x = “startx –nolisten tcp”
Creating compressed files
tar.gz
It is possible to create tarfile (tarball) as follows:
tar -c file1 file2> foo.tar
To ‘zip’ tar the same thing:
gzip -c file1 file2> foo.tar.gz
or:
tar -cvzf diretorio.tar.gz directory/
tar.bz2
Change the ‘z’ at ‘j’ to create bzip2 files.
tar -jxvf arquivo.tar.bz2 (descompactanto bz2)
zip
zip -r filename.zip files
Screenshots
import -w root tela.jpg
xwd > tela.xwd
The vi(m) editor
a / i: Adds text (append / insert).
y / w: copy and paste (copy / paste).
x: delete letter.
/: Seek word (n: next N: prev).
u: undo (undo).
v: select text (visual).
: edit file: creates new buffer.
ls: list buffers.
: buffer N: edit buffer N.
: BDELETE: delete buffer.
: so $ VIMRUNTIME / syntax / 2html.vim: converts source in html.
: ab SW slackware: Creates abbreviation (abclear:. remove abs)
map: qa! : Maps button (add in .vimrc)
To record type ESC followed by
: wq (write and quit)
: q! (exit without saving)
: q! (close all)
Other utilities in console
whatis / apropos: program description.
bc: calculator (eg echo “scale = 2; 1/10” | bc // scale are the decimal places).
nano: simple text editor (nano-editor.org).
jed: text editor for programmers.
mc: the midnight commander.
Magic SysRq!
For situations where we have no access to the system via ssh / telnet, the ALT + SysRq/PrintScrn + X combination can be very helpful.
Example: ALT + SysRq + … k: kills the current VC; e: SIGTERM (except init); i: SIGKILL (except init)
To restart the system safely, type the following:
Alt + SysRq S (sync), Alt + SysRq U (unmount), Alt + SysRq B (reboot)
In the terminal, the processes will be described, so just go to the next step after the first.
A
adduser – create a new user.
alias – allows you to name a set of commands to be executed by the system, by a single name.
apropos – which tells the Linux commands have, in their definition, a determined expression.
air – includes/updates/extract/delete files from/to a file repository.
at – schedule tasks to be performed by the system.
atq – lists the tasks scheduled with the at command.
atrm – removes scheduled tasks.
awk – language processing and demand patterns.
B
bg – is a program that is running in the foreground, go running in the background.
C
cal – displays a simplified calendar.
cat – concatenate and/or displays one or more files.
cd – changes the current directory of the user’s work.
chfn – change the information submitted by finger utility.
chgrp – change the group files/directories.
chmod – change the file access permissions/directories.
chown – change the owner and the group files/directories.
chsh – change the default shell user.
clear – clear the terminal screen.
Linux commands – explains the format of Linux commands.
compress – compresses/decompresses files.
virtual consoles – Linux interface with users.
disk quotas – sets the amount of disk space each user can use.
cp – copy files and directories.
crontab – schedule tasks to run periodically.
Wildcards – *,? and []
cut – selects columns from a txt file or standard input.
cvs – Application for source code management.
D
date – Displays or modifies the date and time of the system.
dd – convert and copy a file.
depmod – produces file containing the module dependencies.
df – Shows the free space partition.
diff – compares two files, in plain text, line by line.
DISPLAY – environment variable that defines where the output of a graphics application should appear.
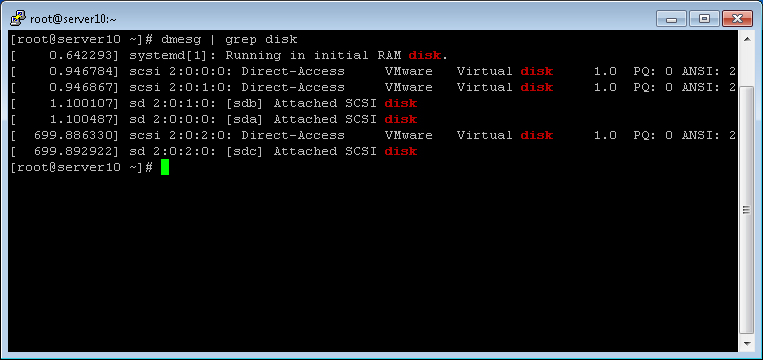
dmesg – displays messages from the last system startup.
du – information on disk usage.
dvips – converts .dvi file .ps (PostScript).
E
echo – displays the contents of directories.
edquota – the quota system editor.
emacs – text editor distributed by the Free Software Foundation.
env – run a program/command in a modified environment.
exit – closes currently running shell in use by the user.
export – shell command that lets you configure and share environment variables between various programs and libraries accessed from the same terminal.
F
fdformat – Low-level format on disk.
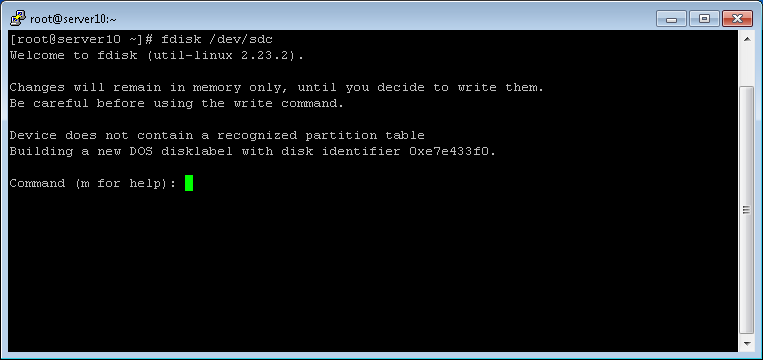
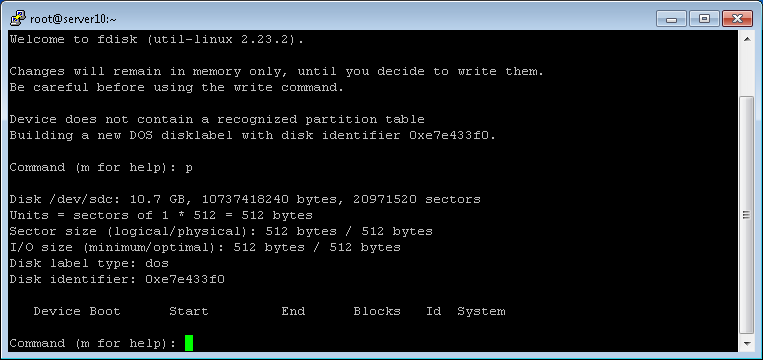
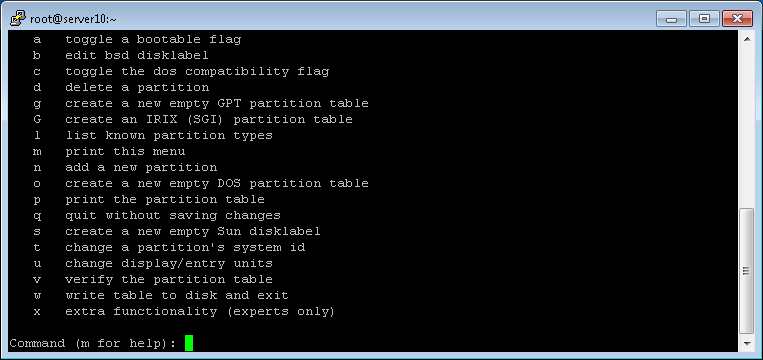
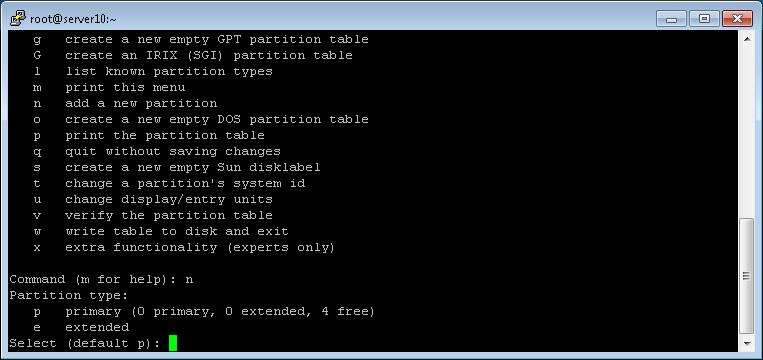
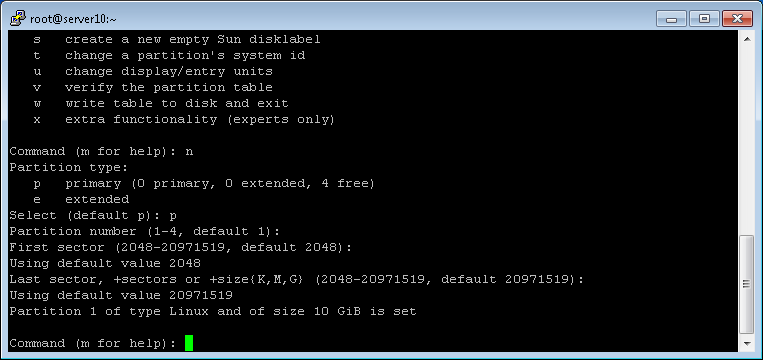
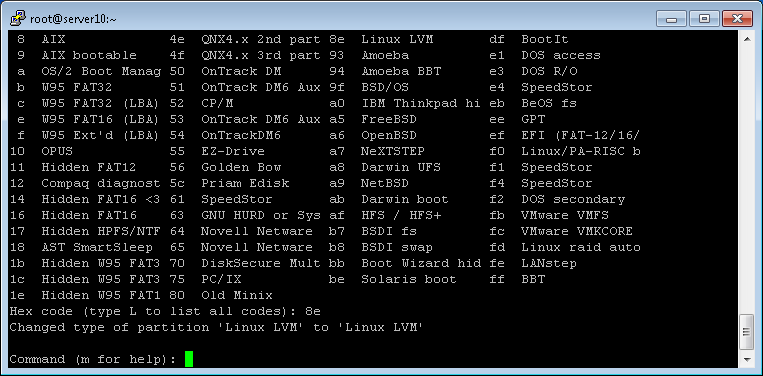
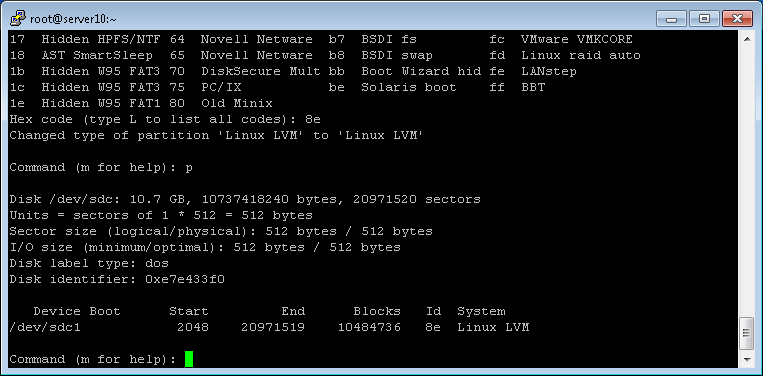
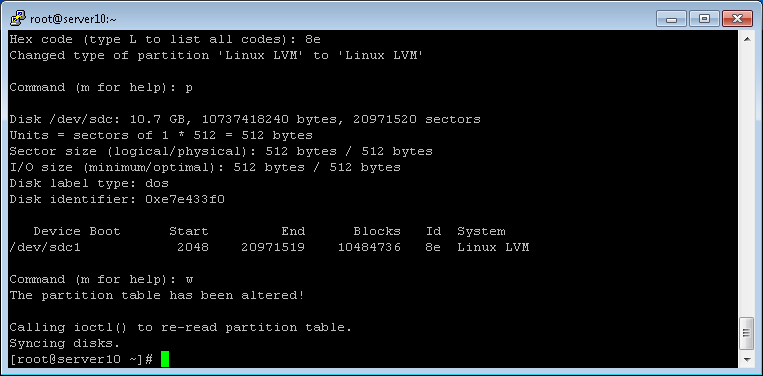
fdisk – application used to partition disks.
fg – is a program that is running in the background (background), pass to run in the foreground.
file – determines the type of file.
find – search files in a directory hierarchy.
finger – displays information about a user.
fortune – application that displays a random quote.
free – displays the amount of free memory/used in the system.
fsck – check and repair a file system.
fuser – identify processes that are using a particular file and/or directory.
G
gcc – C compiler for Linux.
gdb – application to debug C, C ++ and Modula-2.
getty – sets the operating mode, speed and line behavior.
ghostview – application to view .ps files (PostScript) and PDF.
GID – group identification number for the Linux kernel.
grep – looks for patterns in a file.
groupadd – create a new group.
groupdel – deletes a group.
groupmod – modify a group.
groups – lists the groups to which a user belongs.
grpconv – uses gshadow system to protect passwords groups.
grpunconv – eliminates the use of gshadow system password protection.
gunzip – decompresses files.
gv – even if ghostview.
gzip – compresses/decompresses files.
H
head – displays the beginning of a text file.
help – displays information about a command.
hostname – show or change the computer name on the network.
hwclock – Displays or modifies the date and time of the machine clock.
I
id – identifies effective UIDs and GIDs and real.
ifconfig – configure a network interface.
init – system startup control process.
inode – directory identifier/file in a file system.
insmod – load kernel modules in the system memory.
ipcrm – remove ipc feature (inter-process communication).
ipcs – provide information on ipc resources (inter-process communication).
ispell – tool for spell checking.
J
jobs – shows the processes running in the background (background).
K
kernel – the Linux kernel.
kill – sends a certain signal to a process running on the system.
killall – sends a given signal to a set of processes that use the same name.
kudzu – a tool that detects and configures hardware devices.
L
last – displays all information about the entry (login) and exit (logout) system users.
lastlog – displays information regarding the last login of each user.
latex – generate .dvi file from the definition of TEX macros.
ldconfig – updates the links to the shared libraries.
less – allows the paging file or standard input.
lesskey – customize the keys used in the less pager.
lilo – Linux boot loader.
linux_logo – application that displays the Linux logos.
linuxconf – Linux Administration tool.
ln – create links between files.
locate – list files whose names match the pattern informed.
login – process responsible for allowing or not users access to the system.
LPC – application for file print control.
lpq – examines the contents of the print queue.
lpr – print files.
lprm – remove the print queue of files.
ls – list the contents of a directory.
lsmod – list kernel modules that are loaded into memory.
M
make – utility to scan and file compilation group.
MAKEDEV – script used to create/change/delete dispositos in /dev.
makewhatis – creates makewhatis database.
man – format and displays the online manual pages.
mc – application for manipulating files and directories.
mesg – enable/disable receiving other users’ messages.
mingetty – minimal getty for virtual consoles.
mkbootdisk – creates a boot disk (emergency) system.
mkdir – creates directories.
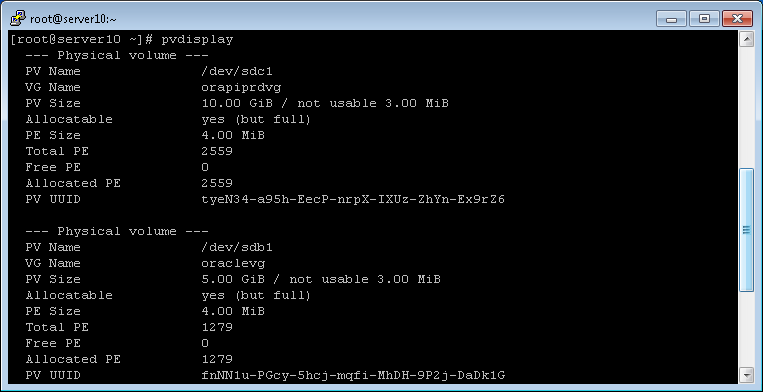
mke2fs – format a disk partition using the ext2 file system.
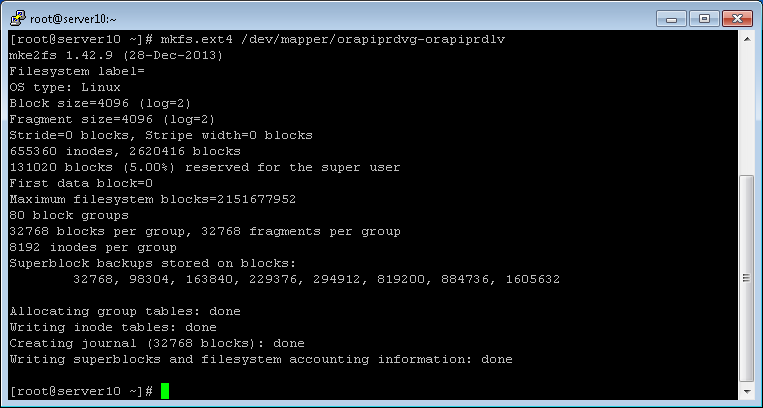
mkfs – build a Linux file system.
mkswap – set up a changing area (swap) Linux.
modprobe – load modules and checks the dependencies of modules.
modules – parts of object code that can be loaded into a kernel in operation.
more – allows the paging file or standard input.
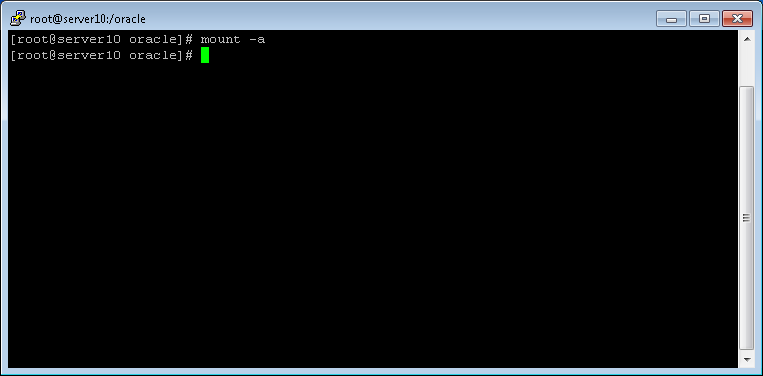
mount – mount file systems.
mouseconfig – application to configure the mouse.
mpage – lets you print multiple pages on a single sheet of paper.
mt – control tape drives.
mtools – utilities to access DOS disks in Unix.
mv – move (or change the name of) files.
N
newgrp – change temporarily the group (GID) of the user.
nice – sets the execution priority of a command or program.
nl – displays the contents of a file listing the lines.
nohup – run a command immune to connection interruptions.
O
P
passwd – change the password of a user.
access permission – permission to read/write/execute a file/system directory.
peak – text editor based on the Pine message system.
PID – identification number (ID) of a process.
pr – format text files for printing.
printenv – show the environment variables used by the system.
process – running program.
ps – display information about the processes that are running on the machine.
pwconv – uses the shadow system to protect user passwords.
pwd – Displays the name of the current directory.
pwunconv – eliminates the use of the shadow password system protection.
Q
share – provides information on the quota system.
quotaoff – disables the quota system.
quotaon – enables the quota system.
R
RCS – Application for source code management.
reboot – reboots the computer.
redirects I/O ->, >>, <and |.
renice – alter the priority of a process that is running.
rev – reverse lines of a file.
rlogin – start a remote terminal session.
rm – remove files/directories.
rmdir – remove empty directories.
rmmod – unload modules of system memory kernel.
root – the superuser or system administrator.
rpm – package manager of the Red Hat distribution.
S
Commands tab -; and;
set – displays the list of environment variables.
setserial – Displays or modifies the settings of serial port.
setterm – sets the terminal attributes in text mode.
shell – Linux shell.
shutdown – shuts down/reboot the system.
file systems – such as files and directories are organized in Linux.
sort – sort the lines of text files.
source – update system files.
split – split a file into smaller files.
strFile – Creates a random access file for storing strings.
Strings – extract binary file strings.
stty – modifies and/or displays the terminal lines of settings.
su – run a shell with substitute user and group.
sudo – runs a command using the privileges of another user.
swap – disk partition used as an auxiliary memory (swap space).
swapoff – disables devices and files for paging and exchange.
swapon – Enables devices and files for paging and exchange.
sync – writes data from memory to the disk drives.
T
tac– concatenates and displays one or more files in reverse order.
tail – displays the last lines of a text file.
talk – allows real-time conversation between two users.
tar – store and extract files from a tar file.
special keys – keys together with special features on Linux.
tee – read from standard input and writes to standard output.
telinit – system startup control process.
telnet – access a machine remotely.
epoch time – date and time that Linux considers the beginning of time.
tex– word processing system for formatting documents.
time – measures the time required to execute a command/application.
top – utility that lists, in real-time processes that are using the CPU.
touch – change the date and time of last access/modification of a file.
tr – delete or change characters.
tree – shows, in a tree format, the contents of a directory.
type – displays the type of a file.
U
UID – User ID number for the Linux kernel.
umask – set the permissions that are not available to system users.
umount – unmount file systems.
uname – displays information about the system.
uniq – remove duplicate lines from a sorted file.
unset – deletes an environment variable.
updatedb – update file name database.
uptime – tells how long the system is working.
useradd – create a new user.
userdel – removes user and their system files.
usermod – modify a system user account.
users – shows the users that are currently connected to the system.
V
environment variables – set variables used to define the working environment for system users.
vigr – edit the file /etc/group.
I came – text editor in ASCII format.
vipw – edit the file /etc/passwd.
visudo – edit the file /etc/sudoers.
W
w – tells which users who are connected and what they are running.
wc – account lines, words and file characters.
whatis – shows a quick summary of one or more commands.
whereis – lists the locations of binary programs, supplies and documentation.
who – which informs users that are connected.
whoami – Provides effective user ID.
X
X or X Window – is the graphical user interface (GUI) standard Linux.
xhost – defines which machine can access the server X.
xman – graphics application of Linux documentation display for the X Window System.
Y
Z
zgrep – looks for patterns in a compressed file.
zip – compact files.